[android] ConstraintLayout Tutorial
https://developer.android.com/training/constraint-layout/index.html
![Alignment, Android, android studio, android.support.constraint.ConstraintLayout, any sized, autoconnect, autoconnect and infer constraints, Baseline, Circle, Click, component tree, constraintlayout api version, constraintlayout for android, constraintlayout performance, contraint 갯수, contraintlayout, convert layout to contraintlayout, default margin, dependencies, Design, dp, drag and drop, dragging, drop, Edge, editor window, flat view hierarchy, gb, gradle setting, guideline, Handle, Horizontal, inter constraints, Interface builder, invisible guideline, layout, layout editor, missing constraint, missing constraints, palette window, parent view, parentview, percent unit, Position, properties, RelativeLayout, remove, RULE, show warnings and errors, support repository, toggle, tutorial, unit toggle, Version, vertical, View, wrap content, [android] ConstraintLayout Tutorial, 기본 규칙, 단위 toggle, 비교, 사이드 코너, 제거, 지그재그 선](https://t1.daumcdn.net/cfile/tistory/9967893359ACE33C02)
-
ConstraintLayout 은 RelativeLayout 과 매우 비슷하게 Flat 한 view hierarchy 를 만들 수 있으면서도. 조금 더 유연하게 사용할 수 있다.
그리고 Android Studio Layout Editor 를 통해 쉽게 설정할 수도 있어 편리하다. ( 이것을 key 로 미는 듯 )
-
여기서 궁금한 거 하나 더!!
Flat view hierarchy 는 알겠는데 그만큼 성능도 좋을까?
결론은 성능도 좋다. ( 다른 layout 에 비해 약 10% 이상 빠르다 )
https://medium.com/@krpiotrek/constraintlayout-performance-c1455c7984d7
LinearLayout & FrameLayout : 3.006ms,
RelativeLayout : 2.8914ms,
ConstraintLayout : 2.606ms
-
ConstraintLayout 은 Android 2.3(GB, API Level 9) 이상부터 사용할 수 있고,
Layout editor 는 Android Studio 2.2 이상부터 사용 가능하다.
-
Constraint 는 2개 이상을 하나의 view 에 적용해야 한다.
이 Constraint 는 다른 view, parent view, invisible guideline 과의 관계를 정의한다.
Constraint 가 없는 뷰는 0, 0 에 위치한다.
-
Missing constraint 가 있어도 compile 은 되지만, Editor 에서 경고 메시지를 띄운다. ( Show Warnings and Errors 에서 확인 가능하다. )
Autoconnect and infer constraints 를 통해 자동으로 missing constraints 들을 채워 넣을 수 있다.
-
ConstraintLayout 을 사용하려면 SDK manager 의 "Support Repository" 에서 "ConstraintLayout for Android” 를 설치하고, 아래와 같이 gradle setting 을 해줘야 한다.
dependencies {
compile 'com.android.support.constraint:constraint-layout:1.0.2'
}
-
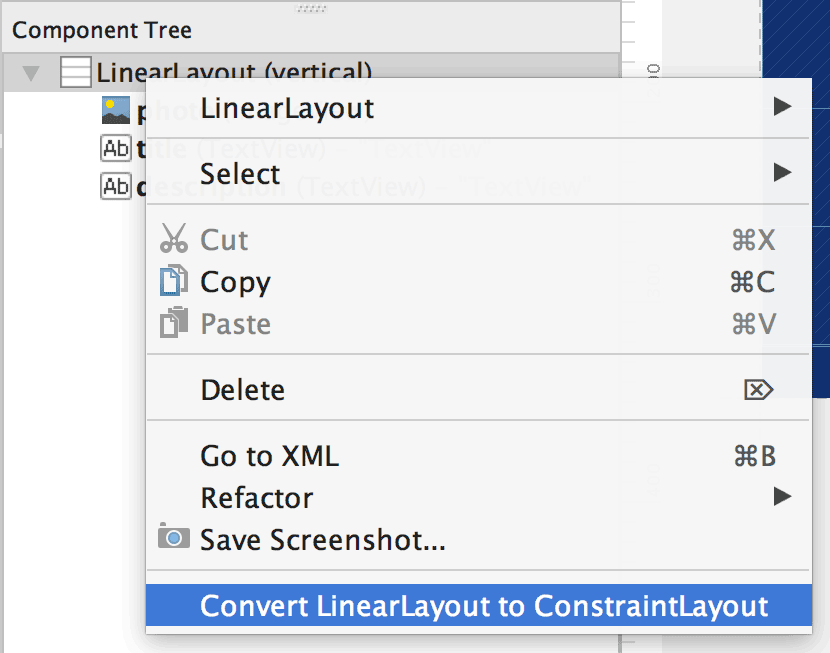
기존에 존재하는 Layout 들도 ConstraintLayout 으로 전환할 수 있다.
( 이 기능을 제공하는 것으로 보아 강력히 밀고 싶은가보다. )
1. AndroidStudio 의 editor window 의 “Design” tab 으로 이동
2. "Component Tree” 에서 우클릭하면 하단에 “Convert XXXLayout to ConstraintLayout” 기능을 사용하면 된다.
-
새롭게 Layout 을 작성하는 경우에는 “android.support.constraint.ConstraintLayout” 를 component 이름으로 해서 xml 을 작성하면 된다.
-
Interface Builder 를 통해 만들 때에는, Palette window 에서 view 를 drag & drop 하고,
View 에 있는 각각의 handle 을 dragging 하여 다른 view 나 invisible bound 에 drop 시키면 default margin( 보통 8dp ) 으로 constraint 가 생긴다.
( Interface Builder 를 사용한 view control 은 최상단 링크 속에 동영상에서 확인 할 수 있다. )
-
Constraint 를 만들 때 다음 규칙들을 따라야 한다.
1. 모든 뷰는 적어도 2개 이상의 constraint 를 가져야 한다.
2. Constraint 는 같은 면을 공유하는 조건에서만 만들 수 있다. 예를 들면 한 뷰의 수직 handle의 constraint 는 다른 뷰의 수직 handle 에 대해서만 만들 수 있다.
3. 각각의 constraint handle 은 한 뷰에 대해서는 한 가지 constraint 만 가질 수 있다. 그러나 한 constraint handle 은 여러 뷰에 대해 여러 개의 constraint 를 가질 수 있다.
-
Constraint 제거는 뷰를 클릭한 후에 handle 을 클릭하면 된다.
-
상반되는 constraint 를 추가하면 지그재그형 선이 생긴다.
예를 들어 view 는 wrap content 인데, 좌우 constraint 를 여백 24 로 주어 크기를 화장시킨다던지..
이 경우 view 는 중앙정렬이 되는데..
제대로 처리하려면 size 를 any size 로 설정해야 한다.
-
전체 영역(사이드, 코너)은 parent view 에 대한 handle 이다.
-
Position, Alignment, Baseline 등의 constraint 가 있다.
-
Vertical 혹은 Horizontal guideline 을 추가할 수 있다.
Layout 의 edge 에 대해 dp 나 percent unit 으로 추가할 수 있다.
Guide line 의 circle 을 클릭하면 단위 toggle 이 가능하다.
Guide line 은 유저에게 보이지 않는다.
-
Autoconnect 는 기본으로 disable 상태인데, on 시킬 수 있다.
enable 이 되면 기본적으로 view 를 add 하는 순간 constraint 들을 만들어준다.
이렇게 생긴 녀석들은 기본적으로 margin 외에 자동 조정되지 않기 때문에 필요없는 녀석들은 알아서 삭제하는 방식 등으로 수정해주어야 한다.
기존에 존재하는 view 들에 대해 만들어주지는 않는다.
-
Inter Constraints 라는 것도 있다.
이 녀석은 Layout 에 존재하는 모든 view 에 대해 constraint 를 만들어 준다.
가까이 존재하는 view 에 대해 가장 적합하다고 생각하는 녀석을 추가해주는 것이다.
-
View 의 properties 를 보면 다음과 같은 기호를 볼 수 있다.
이들은 click 으로 toggle 시킬 수 있다.
 : wrap content
 : any sized, constraint 에 match 하는 size 를 갖는다. 실제 값은 0dp 가 된다.
 : fixed
'프로그래밍 놀이터 > 안드로이드, Java' 카테고리의 다른 글
| [android] ArrayMap 과 SparseArray 를 이용한 최적화 (0) | 2018.03.05 |
|---|---|
| [android] Visual Voicemail (0) | 2018.03.04 |
| [android] Bundled Notification Tutorial (3) | 2018.03.02 |
| [android] Messaging Style Notification Tutorial (0) | 2018.03.01 |
| [android] Direct Reply Tutorial (0) | 2018.02.28 |


댓글